Materials
- MDF Board – Buy at a Hardware Store
- FOAM SHEETS – Buy at a Hardware Store
- CONSTRUCTION ADHESIVE – https://amzn.to/3mxYdlY
- HOBBY PAINT – https://amzn.to/3v02a6P
- MOD PODGE – https://amzn.to/3iCfdGC
- TESTERS DULLCOTE – Buy at a Hobby Store. Make sure it’s DULLCOTE
- DIY WASH – See Online Tutorials
Tools
- JIGSAW – https://amzn.to/3mznE6T (Be Careful With This!!)
- DREMEL – https://amzn.to/3Fp5kWz
- HOT WIRE CUTTER – https://amzn.to/3FrVGmi
- BOX CUTTERS – https://amzn.to/3oCEMLs
- PAINT BRUSHES – Available almost anywhere

Getting Started
First get a rough idea of what you want your rock formations to look like. You could sketch some ideas out ahead of time or just wing it. You’ll need some Foam Board. (This can be purchased at most hardware stores) Draw the general shape of the rocks into the foamboard and cut it out with a good knife or box cutter. Depending on how high you want your rocks you may need to stack multiple layers of foam.
Building the Base
In my opinion, MDF board is great for terrain basing. It’s strong and adds a lot of weight to what could otherwise be a very light and easily knocked-over piece of terrain. You can buy MDF in 1/8″ or 1/4″ sheets for fairly cheap. I use a jigsaw to cut my MDF bases out and then a Dremel with a drum sanding attachment to bevel the edges. You could use a sander as well, but I’ve found that the Dremel makes quick work of this task.

Glue it together
It’s time to glue everything together! Construction Adhesive works great for this. (Just don’t use anything that might melt the foam!) Hot glue works too at a low temperature. I’d avoid using PVA glue for this if you are joining 2 large pieces of foam together. The PVA glue might not fully dry.
It can help to score the foam pieces before joining then to allow more air flow and create a stronger bond.

Shaping the Rocks
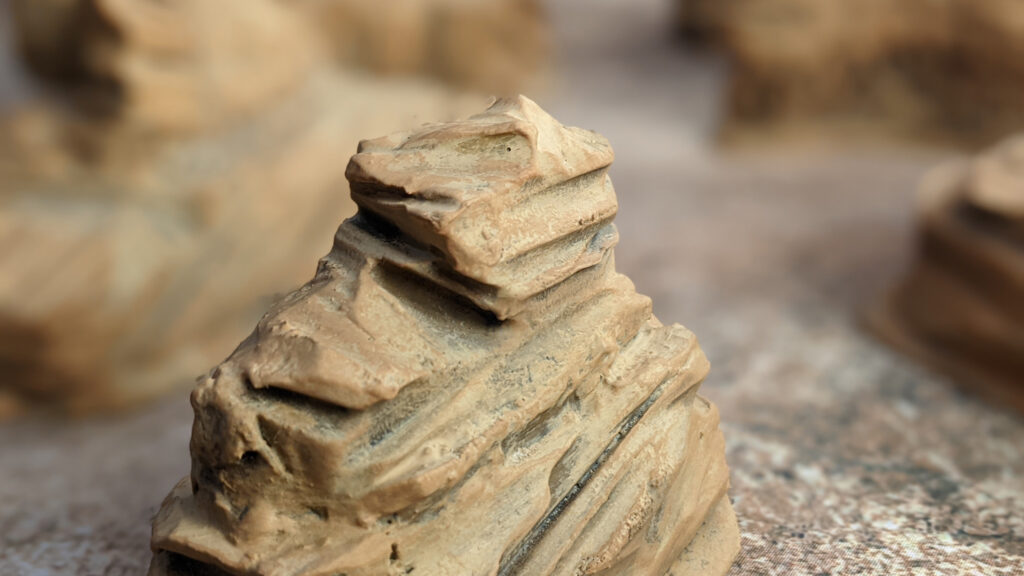
For this project a hot wire cutter is really helpful. If you don’t want to invest in a hot wire cutter (understandable), a box cutter with a sharp blade will work just fine. Find some reference pictures you like the look of and start sculping the foam.
There’s a great (and easy!) technique for creating the effect of crumbling rocks. Just use a blade to score the foam several times horizontally and then vertically. Then just use anything with a hard edge to rake the foam. Chunks of foam will come out and you should end up with a very realistic-looking texture that looks like a crumbling rock wall.

Painting the rocks
A Mixture of Mod Podge and cheap acrylic paint seems to be the gold standard for base coating miniature terrain. Mix enough paint into the Mod Podge to get a nice dark earthy color. Make sure to get it into all the recessed areas. This will be your shading layer. Give this a day to dry.
Next pick a lighter brown color to paint over the rocks, leaving the darker colors in the recesses where shadows would fall.
Once that dries go over the whole piece with a wash. This should tie everything together.
Once the wash dries go in with an even lighter tan color to highlight the brightest spots on the rocks. Continue to layer different shades of paint on until you’ve achieved your desired look.
Sealing the Paint
Once you are satisfied with the way your desert rocks look spray them with a matte finish. I really like Testers Dullcote. Just make sure you are using Dullcote and not Glosscote. The difference between the packaging of the 2 products is surprisingly small.
And just like that, you have some great looking desert rock terrain for your tabletop games!

I hope you enjoyed my tutorial and found it helpful!
FOR MORE IN DEPTH TUTORIALS & PROJECT UPDATES CHECK OUT
Or Check out the Haunts’ Wargaming YouTube Channel