Materials
- MDF Board – Buy at a Hardware Store
- FOAM SHEETS – Buy at a Hardware Store
- CONSTRUCTION ADHESIVE – https://amzn.to/3mxYdlY
- MILLIPUT – https://amzn.to/3pNG47b
- GREEN STUFF – https://amzn.to/3Bs1Sra
- HOBBY PAINT – https://amzn.to/3v02a6P
- MOD PODGE – https://amzn.to/3Buk8A8
- TESTERS DULLCOTE – Buy at a Hobby Store. Make sure it’s DULLCOTE
- DIY WASH: Water, Matte Medium, Ink and a dab of Dish Soap.
- MATTE MEDIUM – https://amzn.to/3EDTdUf
- INK – https://amzn.to/3mtcq59
- MEADOW FLOWERS – https://amzn.to/2ZDNxuW
PPE (Safety Stuff For Handling Resin)
- RESPIRATOR – https://amzn.to/3C6D1Kx
- 3M P100 RESPIRATOR CARTRIDGE – https://amzn.to/3CdouN4
- CLEANING GLOVES – https://amzn.to/3b3xF73
- SAFETY GOGGLES – https://amzn.to/3mqyXPV
Tools
- JIGSAW – https://amzn.to/3mznE6T (Be Careful With This!!)
- DREMEL – https://amzn.to/3Fp5kWz
- HOT WIRE CUTTER – https://amzn.to/3FrVGmi
- BOX CUTTERS – https://amzn.to/3oCEMLs
- PAINT BRUSHES – Available almost anywhere

Getting Started
For this project I wanted to build a desert boneyard.
Usually when I’m starting a project I do a heinous amount of Google research to find images similar to what I want to do. This project was no different. I picked out a few images of “boneyard concept art” that I really liked (There isn’t a whole lot out there unfortunately) and drew some rough sketches of terrain nodes.
3D Skulls and Bones
I recently bought a resin printer so I was jonesin’ to use some 3D Printed elements for this project! I looked on Yeggi.com and Thingiverse.com for some good looking skulls and bones files. After I found a few, I printed them out on my AnyCubic Photon Mono Printer.
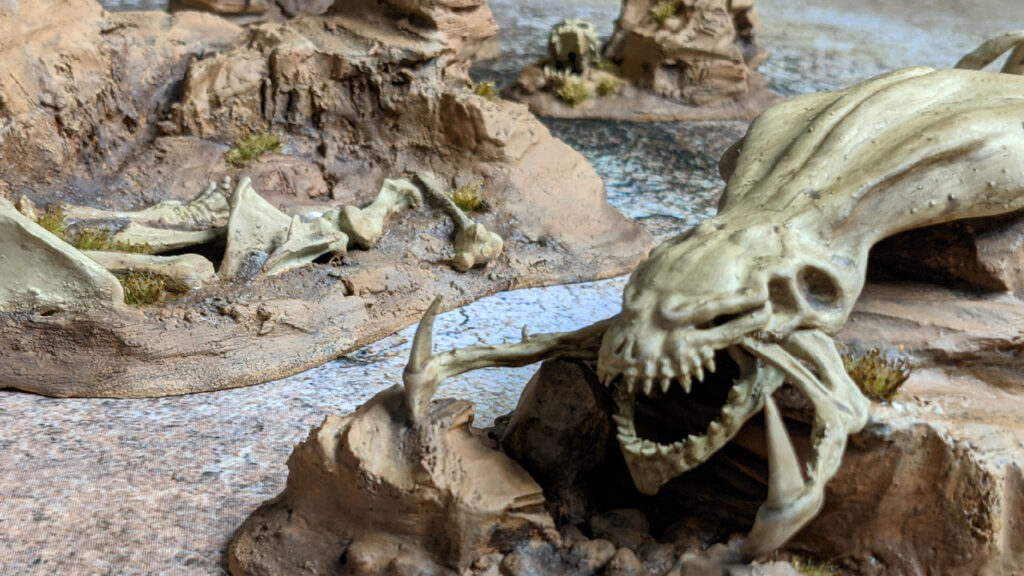
One of the wonderful things about 3D resin printing is that you can scale the files to any size you like. So I printed out a few different sizes of some of the skulls to add a bit of ancestry to my project. In particular, In one of the terrain nodes I used 2 different sized canine skulls to give the appearance of a parent and offspring that met some cruel fate together.
Don't have a 3D Printer?
For a few of the terrain nodes I sculped my own rib bones out of Milliput and Green Stuff. I had never actually used Green Stuff before and wanted to compare the two. I ended up liking a 50/50 mixture of the two more than either one individually! You get the strength of Milliput and the flexibility of Green Stuff.
So if you don’t have access to a 3d printer, putty is a good option. Or if you aren’t in a hurry, you could find some great skeletal decor at the dollar store around Halloween!
You could also use Citadel Skulls.

MDF Bases and Foam
I laid the skulls and bones out on a sheet of MDF and outlined my bases with a pencil. I didn’t really have a concrete idea of how I wanted them to look at that point. I was mostly just improvising.
In my opinion, MDF board is great for terrain basing. It’s strong and adds a lot of weight to what could otherwise be a very light and easily knocked-over piece of terrain. You can buy MDF in 1/8″ or 1/4″ sheets for fairly cheap. I use a jigsaw to cut my MDF bases out and then a Dremel with a drum sanding attachment to bevel the edges. You could use a sander as well, but I’ve found that the Dremel makes quick work of this task.
After cutting the bases out I picked out bits of foam to use as rocks. The foam bits were mostly left over from a previous project, so a lot of the texturing was already done. I did have to bust out the hot wire cutter and hobby knife for some spots though!
Note: If you are using a hot wire cutter on foam, do it in a well-ventilated area

Combine the Materials
One by one I built up each terrain node, using construction adhesive to glue together the foam and bits of bone. I wanted the bones to appear as if they were partially buried in sand and dirt so I had to break a few to get them to fit right. I was kinda kit-bashing at this point. It was a lot of fun putting the pieces together!
Once the hardscape stuff was in place I coated the exposed MDF with construction adhesive and dumped sand and grout on the bases. After that was dry I dumped a mixture of PVA glue and water on the sand/grout to seal it in place.
CAUTION: Wear a respirator when handling grout! You DO NOT want to breathe this stuff in.
Good Old Drywall Compound
Finally, I smeared some good old Drywall Compound into most of the cracks and seams on the foam rocks. This goes a long way in helping give the rocks a more organic look. I used a wet brush to smooth it out and remove the excess. If this is done correctly you don’t need to do much more to it after it dries, however I do like to rake the rocks with a wire brush to add some textured lines.
Check out my Desert Rocks Tutorial For more info on sculpting rock terrain!

Priming & Painting
For my first layer I coated the rocks and gravel with a mixture of Mod Podge, Water and Paint. The Mod Podge helps seal everything and fill in any unwanted holes/gaps. I coated the bones with a grey primer.
I then painted a terracotta color on the rocks and Army Painter’s Skeleton Bone on the bones. Next I dry-brushed a lighter brown color onto the rocks. After that had dried I applied a burnt umber wash to the models. You can find my wash recipe at the top of this post.
At this point I could’ve sprayed a topcoat on and called the project done. But I wanted to give the project a little more contrast. I used a darker brown to add some shading to the rocks and around the edges of most of the bones to help them stand out more. I then dry-brushed a light tan color on the tops of the models and hi-lighted the edges to simulate sunlight. Finally I went in with the terracotta color again and blended the darker and lighter shades together.

Adding Flora
I really wanted to incorporate some of Army Painter’s Meadow Flowers Tufts. The juxtaposition of the flowers in a boneyard could be fun and maybe a little poetic. However, after sticking them on, they looked too vibrate to be in an arid, desert area, so I covered them with a wash made of Burnt Umber Ink, Water and Mod Podge. As an added bonus, the Mod Podge helps glue the tufts in place as well. I think the wash helped give them a more gritty look.
Note: If you want to give a damp look to certain spots on the models, just dab a little bit of Mod Podge on!
One last Thing
The only thing left to do was to spray the boneyard models with a matte finish. I really like Testers Dullcote. Just make sure you are using Dullcote and not Glosscote. The difference between the packaging of the 2 products is surprisingly small.
I’m really happy with how this project turned out! 🙂


I hope you enjoyed my tutorial and found it helpful!
FOR MORE IN DEPTH TUTORIALS & PROJECT UPDATES CHECK OUT
Or Check out the Haunts’ Wargaming YouTube Channel